

I’ve thought about building a fairy garden for my daughter (and me, if I’m being entirely honest!) for a few years now.
But I’ve been put off by the elaborate, fancy, expensive ones that adorn Pinterest, Instagram and the like.
However, I soon realised it doesn’t have to cost the earth or involve lots of new stuff. The most expensive addition to our fairy garden was three alpine plants, compost and some pea gravel.
It’s amazing how many fairy-garden-ready items you can find kicking around your shed/house/garden, neglected for ages and needing a new purpose in life. Charity/thrift shops are also treasure troves for little bits and pieces.
For the container, I recycled an old Belfast sink which had seen better days and added a log that didn’t quite fit in our fireplace last winter.

Tiny sawn pieces of branches made an ideal table and chairs and I used old glass beads for the pond/paths.

Even fairies have to do washing occasionally so I took two twigs and a piece of twine and cut up some odd scraps of material with pinking shears for the washing. It’s held on with mini pegs, the kind you get in most craft shops.

I did concede to a small person’s requests for a few new items, namely this cute ceramic cat, which fits perfectly into his shell bed we dug up. The fairy door was also bought for this project.
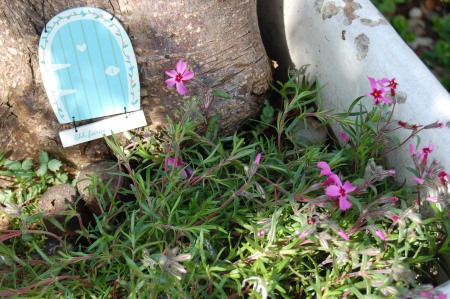
Knots and holes in the log were chiselled out to insert windows.

Not sure the whale is a native to the garden pond, but he moved in all the same.

This is the garden’s first Spring as it was built last autumn. Other than having to replace the washing line and take out a few random weeds, it hasn’t needed any maintenance. Unlike a made-to-measure shop bought one, this approach takes a little while longer to ‘bed in’, but I think it’s all the better for it.
You can make the basic garden in a few hours and just add to it as and when you like. Just make sure if you’re using a heavy container like an old sink that it’s in situ before you start! The mix was about a third grit to two-thirds compost as I didn’t want it too rich for the alpines.
It’s also important to make sure you have adequate drainage so the plants don’t rot. As well as a gritty mix of soil, I added small stones along the bottom of the sink and made sure the plug hole was clear.
When choosing plants, alpines are ideal as they don’t take much looking after and are fairly small and compact so work to scale in a garden this size.
The whole garden, including compost, grit, plants and the fairy door and cat, came to just over £10. All the other items were recycled.
It really is very simple and cheap to make and will reward you with hours of play: the only limit is your imagination! Hope you’ve been inspired to sprinkle a little magic fairy dust in your garden soon.


